Today we will discuss how to upload a file or document with metadata in Document and Media Portlet of Liferay. For Example like we upload a document like resume .Name and Description are already there but we need extra fields like experience,candidate name, location, Previous company etc which are associated with the resume.This is done by using Document type .Before reading this blog it is highly recommended to read my previous blogs on Document and Media Portlet in Liferay.
So lets start this step by step:-
Step 1:-Create Metadata Sets
Go to Admin-->Content-->Document and Media-->Manage-->Metadata sets.

After Click Metadata Sets click on Add. Then a new window is open where you provide Name of your metadata sets give it as resume.Now there is GUI tool you should drag and drop to create your metadata fields.

By using field tab you can insert your fields here i am using one text field for Candidate Name and Second Field is decimal for experience.Now for other settings like label and required you can click on setting tab as:-

All these entries are stored in table ddmstructure in xml format as:-
Step 2:-Create Document Type
Go to Admin-->Content-->Document and Media-->Manage-->Document Types-->Add
Similarly as in Step 1 Give name, description and if you want some more fields add here.Here i use name as Resume Type.
Finally Click on select metadata sets and select metadata created in first step ie Resume and Click Save.
This entry is save in dlfileentrytype table in xml format as:-
Note:- We can directly create candidate name and experience in Document Type but a good approach is to create first metadata sets and then select in document type . By using this approach we can select multiple metadata sets in single Document Type.
Step 3:-Add Folder
Go to Admin-->Content-->Document and Media-->Add-->Folder Provide name and Description.

And Click Save.Now go to that folder click edit and select document type created in step 2 ie Resume Type

And Click Save.Now this folder can take Resume Type documents.
Step 4:-Add Documents
Go to Admin-->Content-->Document and Media-->Naukri(Your Folder)-->Add-->Resume Type
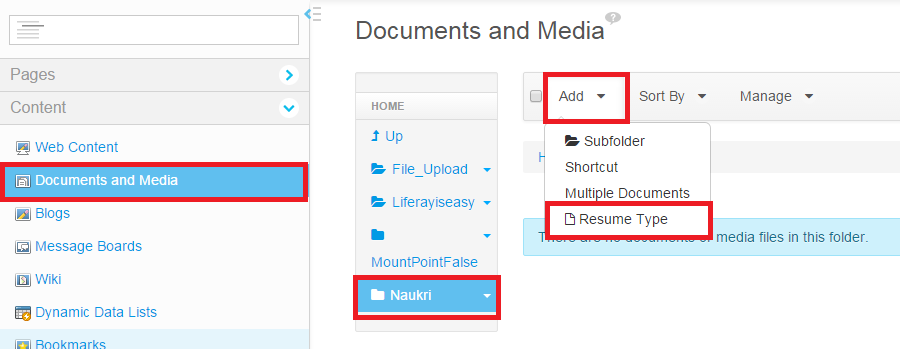
Then a new window open add all the fields and Click Publish.

Default fields are stored in dlfileentry as:-
Metadata Fields are Stored in ddmcontent as:-
Their are two entries one for metadata and second for file.
Hope this will Help.....
Related Post:-

No comments:
Post a Comment